Category: Fire Pit Furniture

  • Fire Pit Seating Creative Ideas

    Fire Pit Seating Creative Ideas

    Creating a fire pit seating area not only brings warmth to your outdoor space but also enhances its aesthetic and functionality. The seating arrangement around a fire pit can create an inviting environment for gatherings, whether you’re hosting a small group or a larger crowd. Below are some fire pit seating area ideas that can inspire your patio design and make your outdoor space both comfortable and stylish.

    1. Circular Seating Arrangement

    • Why it works: Since fire pits are typically round or oval, arranging your seating in a circular layout around the fire pit enhances the sense of unity and community. It allows everyone to enjoy the warmth and view of the flames equally.
    • What to include: Consider using outdoor club chairs, benches, or lounge chairs arranged in a circle. Add soft, weather-resistant cushions to increase comfort.

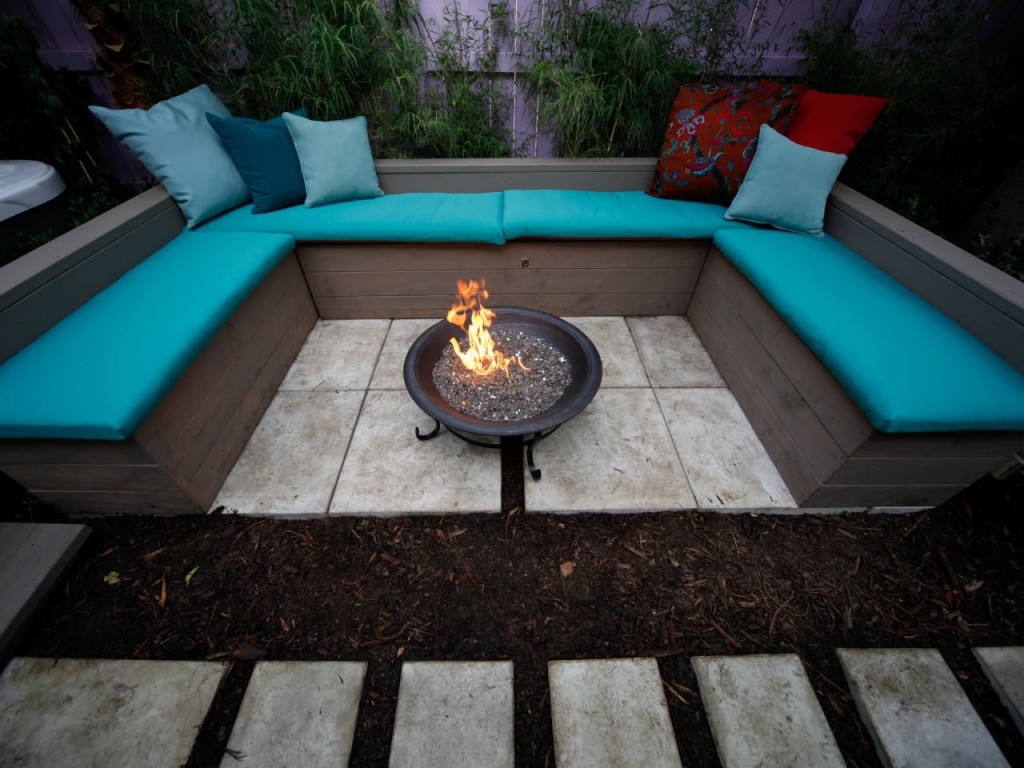
    2. Built-In Bench Seating

    • Why it works: If you have limited space or want to create a more permanent, integrated look, built-in bench seating around the fire pit can be an excellent option.
    • What to include: Stone or brick benches that match the fire pit design. Add cushions for extra comfort and style.

    3. Modular Outdoor Furniture

    • Why it works: For versatility and flexibility, opt for modular outdoor seating that can be rearranged depending on the number of guests or your current needs.
    • What to include: Modular sofa sets or individual seats that can be moved around the fire pit for different configurations. These can be made of durable, weather-resistant materials like wicker or aluminum.

    4. Cozy Sectional Sofa with Fire Pit Centerpiece

    • Why it works: A sectional sofa surrounding a fire pit can create an intimate and cozy space for conversations and relaxation. It’s perfect for larger gatherings and can easily accommodate several people.
    • What to include: Choose deep seating sofas that are comfortable enough to encourage long conversations. Ensure the seats are positioned in a way that everyone can face the fire pit.

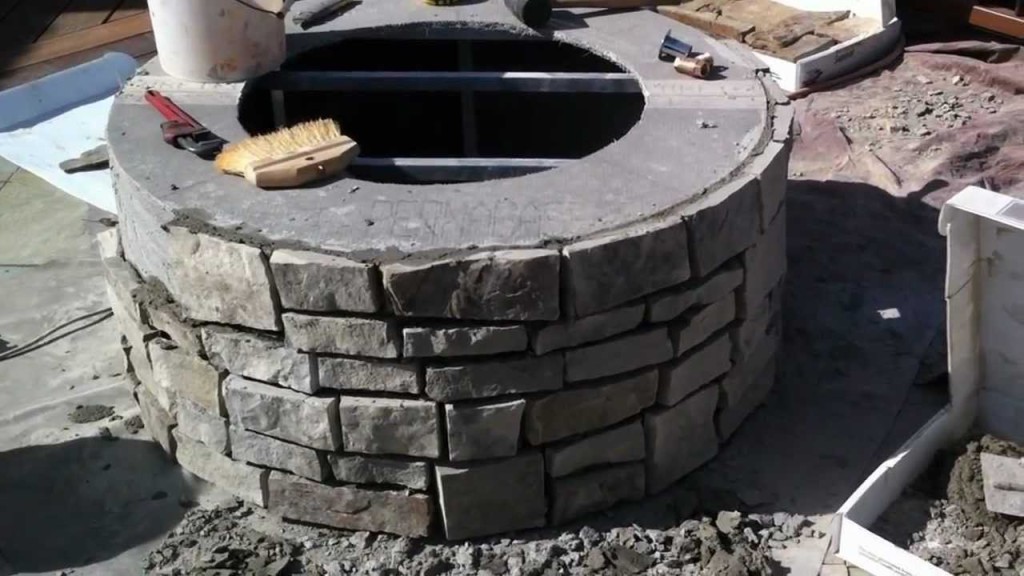
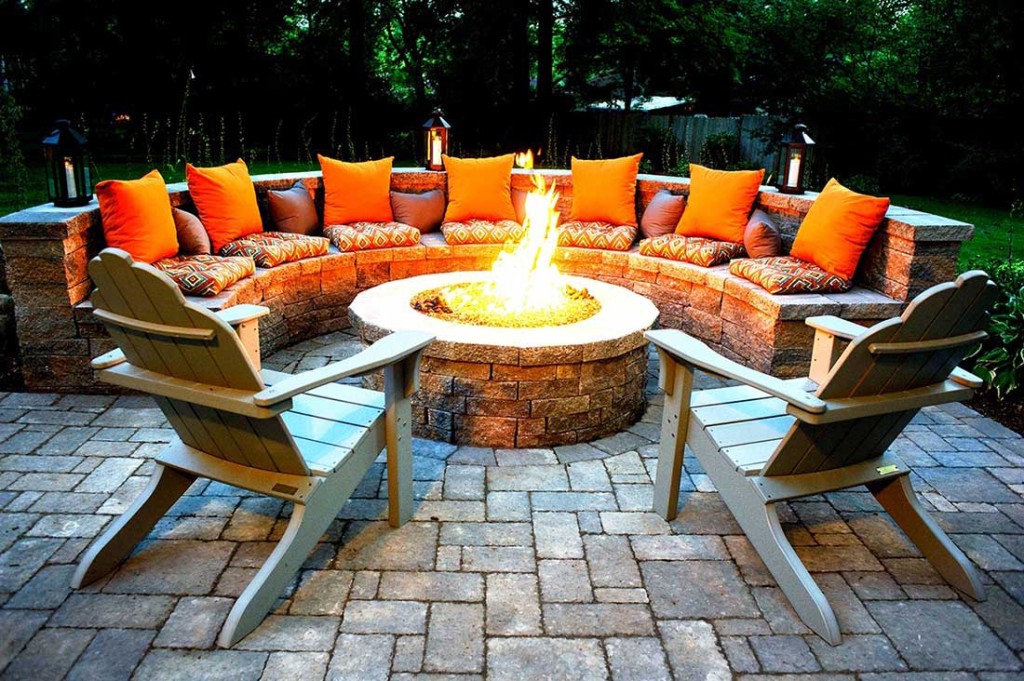
    5. Natural Stone Fire Pit Seating

    • Why it works: Stone seating creates a rustic, natural look that pairs perfectly with a traditional or flagstone fire pit. The textures of stone furniture reflect the ruggedness of the outdoors and provide durability.
    • What to include: Stone benches or stone stools around the fire pit. These pieces withstand the heat of the fire and blend seamlessly with natural surroundings.

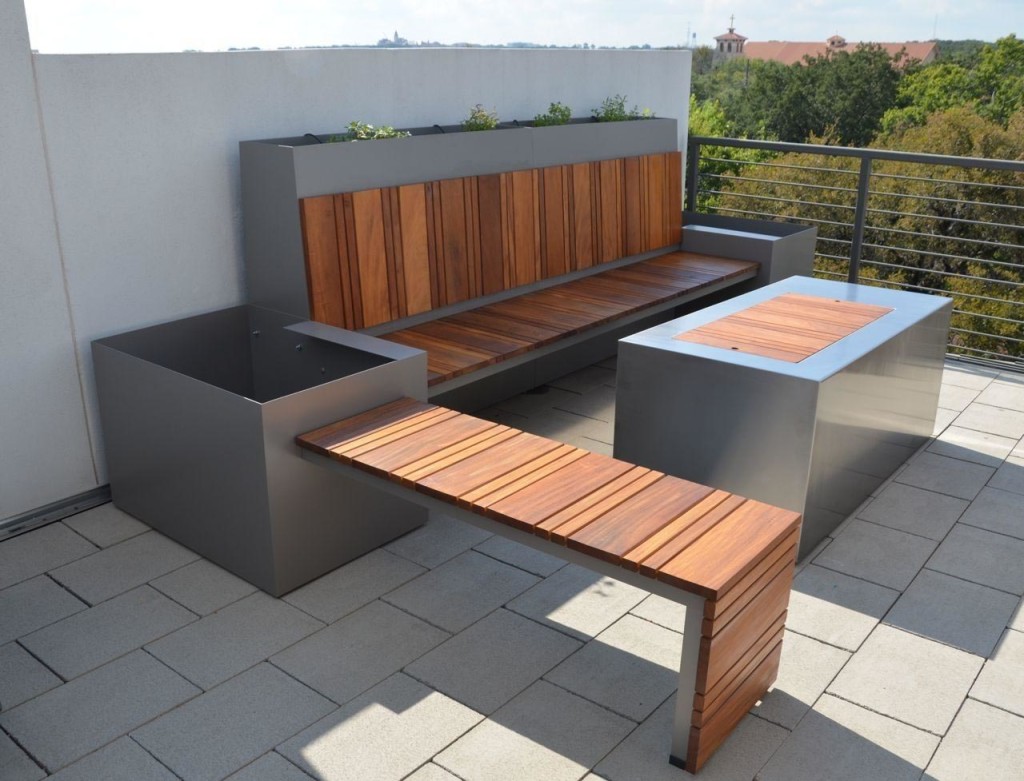
    6. Modern Metal Seating with a Fire Pit

    • Why it works: For a more contemporary, sleek look, metal furniture around a fire pit can offer clean lines and a minimalist style that complements modern designs.
    • What to include: Aluminum or steel chairs or sofas with cushions. Metal furniture can withstand heat and is often lightweight enough to move around.

    7. Swinging or Hanging Seats

    • Why it works: If you want to add an element of playfulness to your fire pit area, hanging swings or swing chairs are a fun option that creates a relaxed vibe.
    • What to include: Hanging chairs or swings positioned near the fire pit to create a playful, casual seating arrangement.

    8. Adirondack Chairs Around the Fire Pit

    • Why it works: Adirondack chairs are a classic choice for fire pit areas, offering a laid-back, comfortable seat with a slanted back that is perfect for relaxing around the fire.
    • What to include: Use wooden or recycled plastic Adirondack chairs for a natural look, or choose polywood versions for a low-maintenance option.

    9. Round Fire Pit with Stone or Concrete Seating

    • Why it works: A round fire pit with matching stone or concrete seating creates a harmonious and cohesive design. This seating style is great for more traditional or rustic-themed outdoor spaces.
    • What to include: Stone or concrete blocks for seating, or you can create custom stone slabs around the pit.

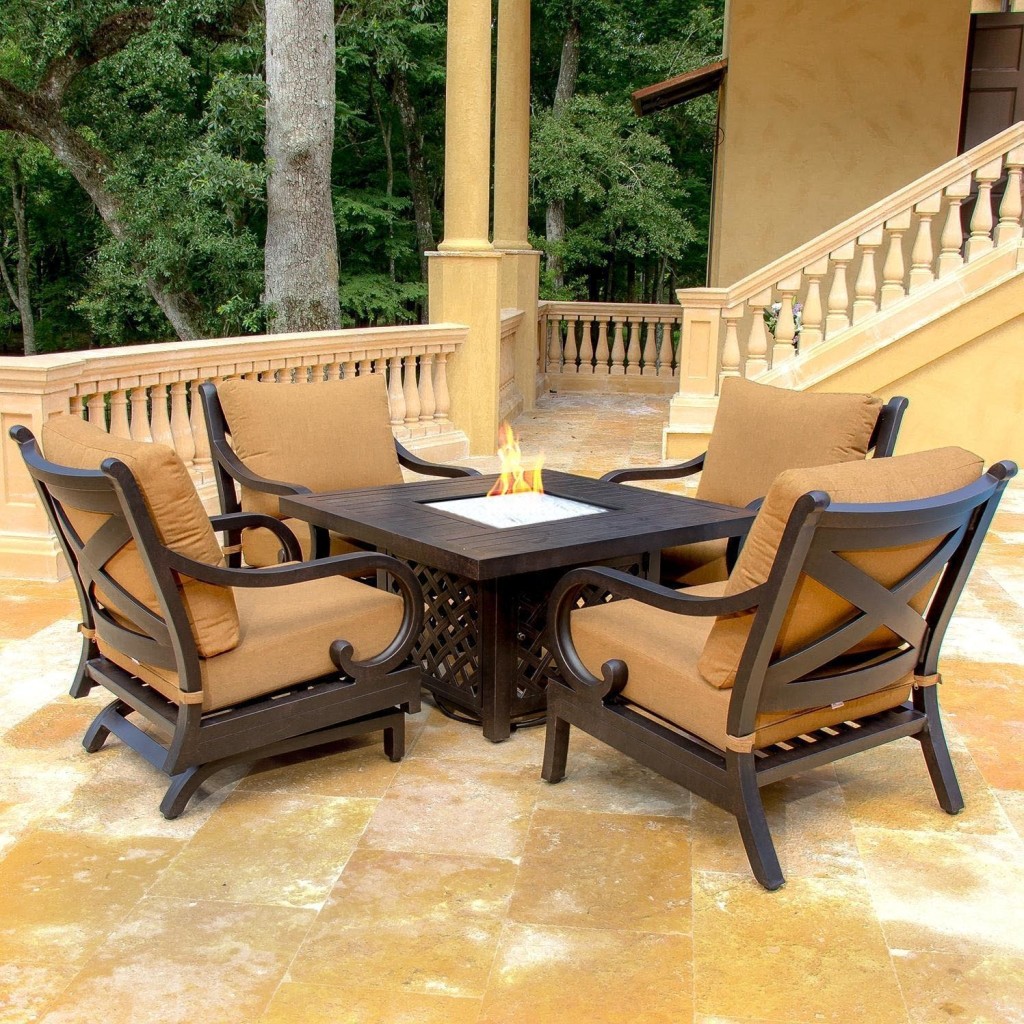
    10. Combining Tables with Fire Pit Seating

    • Why it works: Incorporating a table into your seating arrangement allows you to enjoy a fire while also having space for drinks, snacks, or a meal. This works especially well for areas that double as dining spaces.
    • What to include: A fire pit table in the center with surrounding chairs or a low-profile table around the fire.

    11. Creating Multiple Zones

    • Why it works: If your patio or backyard is large, creating multiple seating zones can allow people to interact in different ways while still being near the fire. It can add to the functionality of the space.
    • What to include: Use different types of seating, such as lounge chairs, benches, or stools, and place them in groups around the fire pit.

    12. Lounge Chairs with Fire Pit Side Table

    • Why it works: For a relaxed, low-maintenance look, lounge chairs placed around a fire pit with a side table provide comfort and functionality.
    • What to include: Adjustable lounge chairs with small side tables for drinks, snacks, or phones.

    13. Fire Pit with a Built-In Grill

    • Why it works: If you enjoy cooking outdoors, a fire pit with a built-in grill allows you to prepare food while relaxing by the fire. Seating around this area becomes even more important for guests to enjoy the experience.
    • What to include: Pair a fire pit grill with long benches or dining chairs for easy access to food.

    14. Fire Pit with Pergola or Gazebo

    • Why it works: Adding a pergola or gazebo over the fire pit area provides shade and protection, especially for rainy weather or sunny days.
    • What to include: Comfortable seating like cushioned chairs or sofas under the structure to create a more sheltered, cozy environment.

    15. Beachy Fire Pit Lounge

    • Why it works: A beach-style seating arrangement with sands, comfy cushions, and lightweight chairs gives a laid-back, coastal vibe perfect for fire pit lounging.
    • What to include: Lightwood or wicker seating with bright-colored cushions and tropical accessories for a beachy, casual vibe.

    Tips for Fire Pit Seating Area Design:

    • Keep Safety in Mind: Avoid placing flammable furniture too close to the fire pit. Opt for stone, concrete, or metal seating that can withstand the heat.
    • Comfort and Durability: Choose weather-resistant cushions or upholstery designed specifically for outdoor furniture.
    • Accessibility: Ensure there’s enough space for everyone to sit comfortably and that the layout encourages easy movement around the fire pit.
    • Lighting: Enhance the mood by adding ambient lighting such as string lights, lanterns, or LED pathway lights.

    With these fire pit seating area ideas, you can turn your backyard into a warm, welcoming retreat for friends and family, making it a perfect place to relax, cook, and enjoy the outdoors year-round!

  • Fire Pit Bench Extraordinary and Stylish

    Fire Pit Bench Extraordinary and Stylish

    A fire pit bench is an excellent addition to any outdoor gathering space, offering both functionality and comfort. Not only does it provide ample seating for guests, but it also creates a cozy, communal environment around the fire pit, where everyone can enjoy the warmth and camaraderie of a shared flame. Whether you’re hosting a casual evening with friends or spending a relaxing night with family, a fire pit bench enhances the overall experience, making it more enjoyable and social.

    Benefits of a Fire Pit Bench:

    1. Maximizes Seating: One of the main advantages of a fire pit bench is its ability to seat more people than traditional chairs or smaller seating options. By surrounding the fire pit with a bench, you can create a larger and more inclusive space for everyone to gather around, making it perfect for group events or family get-togethers.
    2. Comfort and Convenience: Benches are often more comfortable and relaxed than individual chairs, especially for extended periods of sitting. Plus, they can be built to accommodate many people at once, so no one has to sit far from the fire, ensuring a more intimate setting.
    3. Nostalgic Feel: A fire pit bench creates a nostalgic, campfire-like atmosphere, reminiscent of summer nights spent around a bonfire. This old-school charm adds to the warmth and appeal of your backyard or patio.
    4. Customization Options: Fire pit benches come in various designs, from traditional straight styles to more modern curved options. Some benches even have backs for added comfort, while others might be designed to fit snugly around a circular fire pit for a more cohesive look.
    5. Affordable and DIY-Friendly: Building a fire pit bench yourself is not only cost-effective, but it’s also a fun and rewarding project. With just a few basic materials, you can create a custom bench that perfectly fits your space and style.

    Design Ideas for Fire Pit Benches:

    1. Straight and Simple Bench: The most basic and classic option, a straight bench is easy to build and doesn’t require a lot of extra effort. This design works well if you have a rectangular or square fire pit and want to create a simple seating arrangement.
    2. Curved Fire Pit Bench: For a more stylish, seamless look, a curved fire pit bench is ideal for round or circular fire pits. This design allows you to maximize the seating around the fire and adds a visually appealing touch to your outdoor space.
    3. Bench with Back: If you prefer extra comfort, a fire pit bench with a backrest is a great option. It provides support for your back, making it more comfortable for long periods of sitting. This style can be easily customized to fit your fire pit’s size and shape.
    4. Modular Benches: If you want flexibility, you can create modular benches that can be moved or rearranged as needed. These can be used to create different seating configurations depending on the size of the group or the layout of your fire pit area.
    5. Add Soft Cushions: To make your bench even more comfortable, consider adding soft cushions or throw pillows. These can be placed on top of the bench, especially if you’ve chosen a hard surface like wood or metal. Not only will they add extra comfort, but they’ll also bring a pop of color and style to the space.

    DIY Fire Pit Bench:

    Building your own fire pit bench is a relatively easy and affordable project that anyone with basic woodworking skills can complete. Here’s how you can do it:

    Materials Needed:

    • Wooden planks and bars (for the seat and legs)
    • Screws and electric screwdriver
    • Wood finish or paint (optional)
    • Saw (for cutting the wood to size)
    • Measuring tape
    • Wooden brackets (optional for added stability)

    Steps:

    1. Plan and Measure: First, determine the dimensions of your fire pit bench. Consider how many people you want it to seat and how much space is available around your fire pit. Use a measuring tape to plan the exact size and shape of your bench.
    2. Cut the Wood: Once you have your measurements, cut the wooden planks and bars to the appropriate sizes. You’ll need enough wood to create the seat, legs, and back (if desired). You can either cut the wood yourself or have it pre-cut at the hardware store.
    3. Assemble the Bench: Start by attaching the legs to the seat using screws. If you’re adding a backrest, measure and attach the back support to the seat. Use a level to ensure everything is aligned properly before screwing the pieces together.
    4. Finishing Touches: If you want a polished look, apply a finish or paint to the wood to protect it from the elements. This will also help enhance the appearance of the bench and ensure it lasts longer.
    5. Install and Enjoy: Place your fire pit bench around your fire pit, making sure it’s positioned safely and comfortably for your guests. Add cushions or decorative pillows for extra comfort and style.

    Conclusion:

    A fire pit bench is a fantastic way to enhance your outdoor space by offering comfortable seating while creating a warm, inviting atmosphere around your fire pit. Whether you opt for a simple DIY design or choose a more elaborate, store-bought bench, it’s a great way to make your fire pit area more functional and stylish. With the added benefit of maximizing seating, a fire pit bench ensures that everyone can enjoy the warmth and beauty of the fire together. Plus, it’s an affordable and easy DIY project that anyone can tackle with basic materials and tools.

  • Ease Way DIY Fire Pit Table Project

    Ease Way DIY Fire Pit Table Project

    Creating a DIY fire pit table is a fantastic way to add both functionality and style to your outdoor space. By making your own fire pit table, you get to customize it to your desired look and size, creating a unique piece for your backyard. Here’s a step-by-step guide for creating a wooden fire pit table top, which is not only practical but also aesthetically pleasing.

    Materials and Tools Needed:

    Materials:

    • Wooden boards (choose a durable wood like cedar, pine, or redwood)
    • 2 lengths of screws (appropriate size for securing boards)
    • Metal and wood brackets
    • Stain and paint for finishing
    • Wood conditioner (optional but recommended for better stain adhesion)
    • Polyurethane (for waterproofing)

    Tools:

    • Jigsaw (for cutting the wood)
    • Electric drill (for drilling holes and screwing the brackets)
    • Palm sander (for smoothing the wood)
    • Tape measure (to check dimensions)
    • Pencil (for marking cuts)

    Step-by-Step Instructions:

    1. Prepare the Wooden Boards

    First, you need to select and prepare the wooden boards. The boards should be long enough to form the top of the fire pit table. Measure the diameter of your fire pit to make sure the boards fit snugly around it. It’s important to plan for a wooden top that covers the fire pit while leaving enough space around the edges for safety.

    2. Cut the Boards to Size

    Next, line the boards up side by side around the fire pit. Using a jigsaw, cut the boards to the approximate size of the fire pit top. Make sure that the cuts are accurate to avoid sharp edges or uneven lines that could disrupt the look of the table.

    3. Mark the Center for the Circle

    Nail a string or a small piece of wood in the center of your fire pit, where the fire pit’s reservoir or cooking area is. This will act as a guide for marking the circle on your wooden top. The string helps you draw a perfect circle. Use a pencil to trace the circle, ensuring that the top of the fire pit is covered evenly.

    4. Assemble the Table Top

    Once your circle is marked, begin screwing the wooden boards together. Use wood brackets to hold the boards in place and metal brackets to provide extra stability. Use the longer screws for the wood brackets and shorter screws for the metal ones. Tighten everything securely with your electric drill.

    5. Cut Out the Circle

    After the assembly, take your jigsaw and carefully cut along the pencil mark to create the circular shape. Go slow and steady for a clean, smooth cut. You can adjust the edges afterward to ensure that the circle is even.

    6. Sand the Edges

    Once you have the circle cut out, use a palm sander to smooth the edges. Sand the top of the wooden boards as well, ensuring there are no splinters or rough patches. The smoother the surface, the better the finish will be.

    7. Apply Wood Conditioner (Optional)

    To help the stain adhere better and to improve the overall finish, apply a thin layer of wood conditioner. This is especially important if you are using a softer wood like pine. Allow the conditioner to dry before proceeding to the next step.

    8. Staining and Sealing

    Now it’s time to add color and protect your wood. Apply a coat of stain to the top, making sure to cover all exposed areas. Let the first coat dry, then apply a second coat for a deeper color and more protection. To ensure durability, finish with a coat of polyurethane to seal the wood and improve its waterproof qualities. This is crucial because the wooden top will be exposed to the elements.

    9. Final Assembly

    Once the stain and polyurethane are completely dry, your wooden fire pit table top is ready to be used. Simply place it on top of your fire pit, ensuring it fits securely and sits comfortably around the fire pit.


    Additional Tips:

    • Safety First: Always ensure your fire pit is set up in a safe location, away from overhanging trees, buildings, or anything else that could catch fire. A fireproof surface or a heat-resistant mat underneath the fire pit can add an extra layer of protection for your lawn or patio.
    • Weather Protection: If your DIY fire pit table will be exposed to rain or other harsh weather conditions, consider adding a removable cover for extra protection when it’s not in use.
    • Decorative Options: Feel free to get creative with the finish and decorative elements. You can paint the table to match your backyard’s theme, add some outdoor cushions, or even incorporate tile patterns around the edges for a more refined look.