
A homemade fire pit can bring a retro charm to your cottage or backyard, adding warmth, style, and functionality to your outdoor space. Whether you’re hosting summer barbecues with friends or just enjoying the warmth of a crackling fire, a DIY fire pit is a fantastic way to create a cozy atmosphere while enhancing your garden’s aesthetic.
Why Opt for a Homemade Fire Pit?
- Affordable and Customizable: You can design your fire pit to match your taste, choosing materials and size that work best for your space.
- Aesthetic Appeal: A well-constructed fire pit is more than just a functional outdoor feature; it can also be a beautiful addition to your garden that becomes a focal point for gatherings.
- Practicality: Beyond its visual appeal, a fire pit provides warmth during cool summer nights, is perfect for roasting marshmallows or cooking meat, and creates a wonderful ambiance for evening get-togethers.


Step-by-Step Guide to Building Your Own Fire Pit
1. Choose the Right Location
The first step is selecting a safe and functional location for your fire pit:
- Distance from Structures: Place the fire pit at least 10 feet away from any structures, such as houses, fences, trees, or sheds. This reduces the risk of sparks or embers catching nearby objects on fire.
- Avoid Low-Lying Areas: Don’t place the fire pit in a flood-prone area, as rainwater could flood it and extinguish the fire.
- Flat, Level Ground: Ensure the ground is level and stable for the construction of your fire pit. It should also be large enough to accommodate the fire pit and seating for guests.
2. Determine the Shape and Size
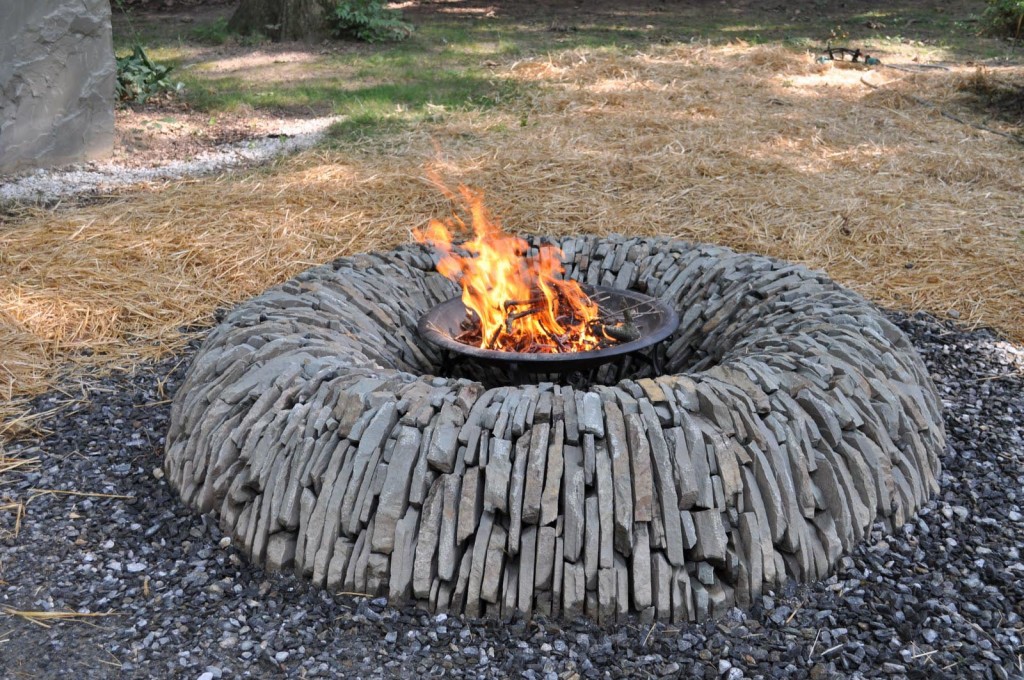
While fire pits can come in many shapes and sizes, the most common and functional design is round, which allows for even heat distribution and provides a natural, cozy gathering space.
- Recommended Size: The ideal diameter for a DIY fire pit is around 90-110 cm (about 36-44 inches). This is large enough to create a substantial fire but small enough to ensure people can sit comfortably around it.
3. Gather Materials
- Fire-Resistant Stone or Brick: Opt for heat-resistant materials like stone, concrete, or fire bricks. These materials will withstand high temperatures and provide a sturdy structure for the fire pit.
- Gravel or Sand: For the base, you’ll need gravel or sand to create proper drainage and prevent water buildup.
- Shovel and Trowel: To dig and level the ground for your pit.
- Optional: Concrete blocks or pre-cast stones for a more decorative, easy-to-assemble structure.
4. Dig the Hole
- Excavate a Hole: Start by digging a shallow hole in the center of your marked area. Aim for a depth of about 6 inches. The hole will be the base of your fire pit.
- Shape the Pit: After digging, shape the edges of the hole into a circular or slightly curved shape to ensure the stone walls will fit snugly around the pit.
5. Lay the Base Layer
- Gravel or Sand Layer: At the bottom of the hole, create a layer of gravel or sand. This will help with drainage and prevent the fire pit from filling with water during rainfall.
- Level the Surface: Use a trowel or shovel to level the gravel or sand, ensuring the base is even.
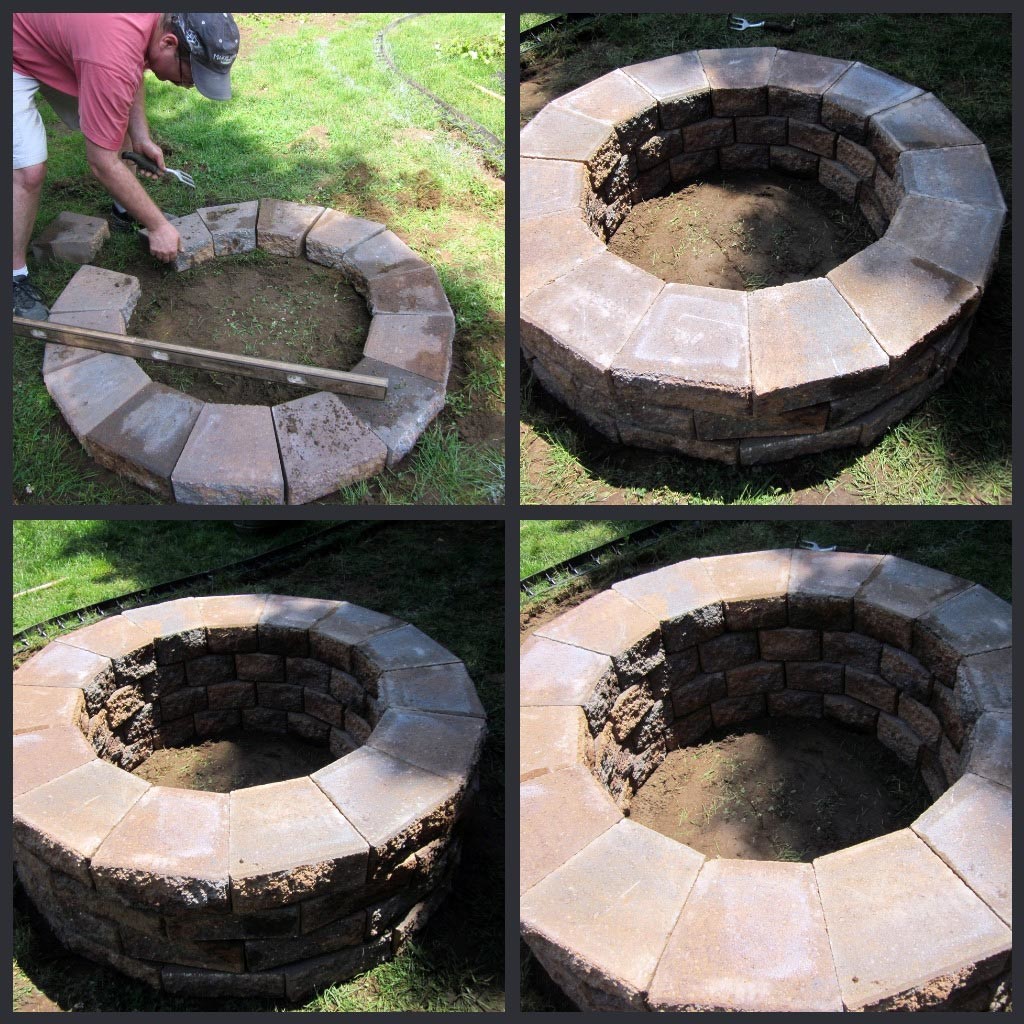
6. Build the Walls
- Start with the First Layer: Begin by laying your first layer of fire-resistant stone, brick, or concrete blocks around the pit’s perimeter. Make sure the stones or bricks are level and snug against one another.
- Stack Layers: Continue stacking the materials, ensuring each layer is secure and properly aligned. You can use heat-resistant mortar or adhesive between the layers for added stability, or leave the stones stacked loosely for a more rustic look.
- Wall Height: Aim for a wall height of 12-18 inches. This height is perfect for controlling the fire while also providing a safe and comfortable space for sitting around it.
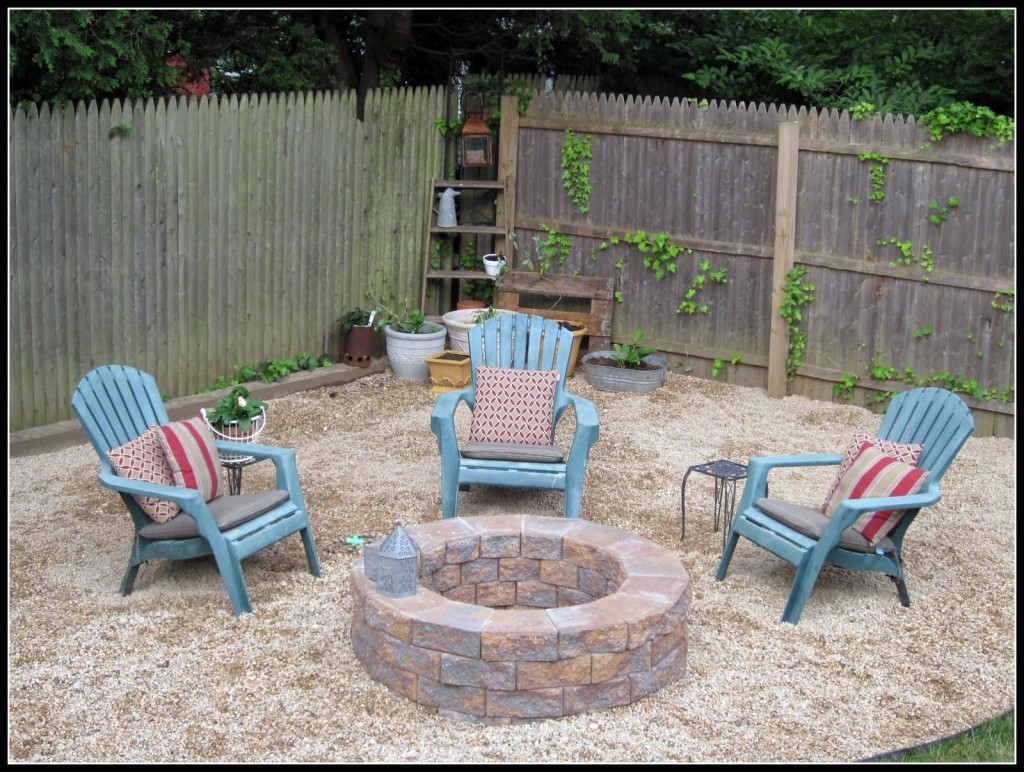
7. Finish with a Decorative Touch
To give your fire pit a personal touch:
- Add Stone or Tile Around the Exterior: You can place decorative stone or tile around the fire pit’s perimeter for an added design element.
- Paint the Exterior: If you’re using concrete blocks, you can paint them with heat-resistant paint to give your fire pit a pop of color that matches your garden décor.
8. Test Your Fire Pit
Once you’ve completed the structure, it’s time to test your fire pit:
- Start a Small Fire: Light a small fire in the pit to ensure everything is stable and functioning properly. Check for any issues, such as loose stones or inadequate airflow.
- Adjust as Needed: If necessary, make any adjustments to the construction to ensure the fire pit is secure and safe to use.


Tips for Making Your Fire Pit Even Better:
- Seating Area: Create a comfortable seating area around the fire pit using outdoor furniture like benches, chairs, or even a built-in stone seating area.
- Wind Protection: Consider adding some windbreaks around your fire pit, such as tall plants, shrubs, or a small screen, to keep the fire burning steadily.
- Safety First: Always have a bucket of water or a fire extinguisher on hand when using the fire pit. Never leave the fire unattended.
A homemade fire pit is a fantastic addition to your garden or backyard. Not only does it enhance the aesthetic appeal of your outdoor space, but it also provides warmth, a place for cooking, and a central gathering point for family and friends. With a few days of work, some basic materials, and a little creativity, you can build your own stylish and functional fire pit that will be the highlight of your summer evenings.
Leave a Reply